Introduction
This post initiates a series of topics centered on a template project I’ve pushed to Github. The repo contains a simple Go web service which integrates a reusable credential-based authorization module to protect routes on the service. I have shared the code for instructional purposes. It is not production-ready and is missing important features like OAuth support.
While there are existing production-ready authentication modules available for Go, I chose to build this module for my own growth. I learned much in the process and have used some of this code in a larger private web service I’m building. My hope is that it will help others on their journey with Go.
Let’s get started!
Service Interface
The project defines a compact REST web service interface using OpenAPI 3:
...
paths:
  /auth/register:
    post:
      tags:
        - auth
      summary: Register a new user
      description: Create a new user with an email and password
      operationId: registerUser
      requestBody:
        description: Credentials for a new user account in the service
        content:
          application/json:
            schema:
              $ref: '#/components/schemas/Credentials'
        required: true
      responses:
        '201':
          description: Successful registration
          content:
            application/json:
              schema:
                $ref: '#/components/schemas/Credentials'
        '400':
          description: Bad request
          content:
            application/json:
              schema:
                $ref: '#/components/schemas/ErrorResponse'
...
While tooling exists to generate golang stubs from OpenAPI specifications, I have not taken advantage of code generation for this project. I’m only using the format to document the API.
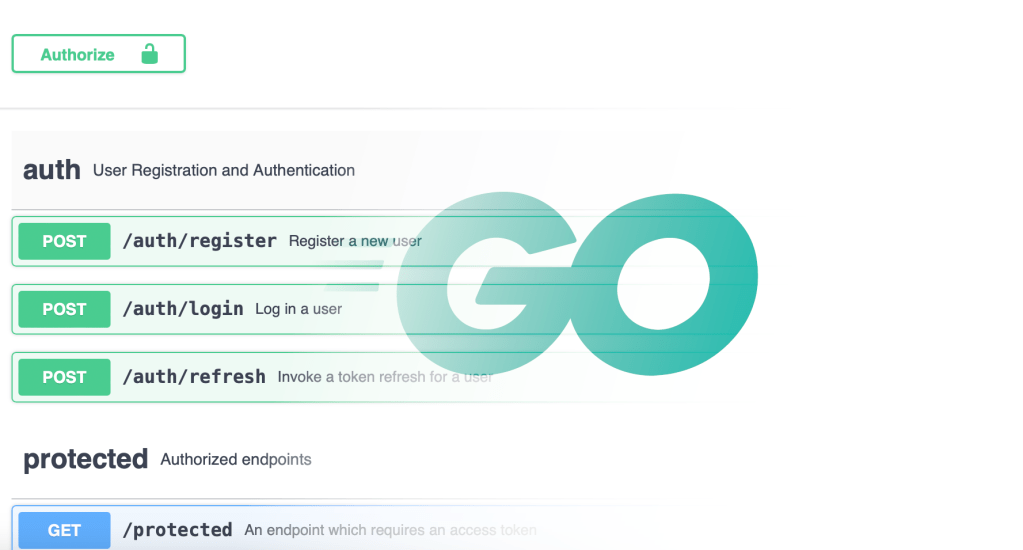
The service interface contains a few authentication-related routes:
- /auth/register – creates a new user from a provided email/password
- /auth/login – returns ID, access, and refresh tokens for a user
- /auth/refresh – provides new tokens given a valid refresh token
Also included is a single route, /protected, to demonstrate how to authorize routes using access tokens and the auth module’s Middleware handler.
Service Implementation
The code integrates net/http from the golang standard library as opposed to one of the more feature-laden web frameworks like Gin, Chi, or Echo. This reflects again on the self-educational motive behind this project. I found the standard ServeMux router easy to work with though, so I wouldn’t hesitate to stick with the standard library in the future.
The code in this section utilizes the auth module to do most of the work. I’ll highlight that interface during the walkthrough, but reserve the details of what is happening under the hood for future articles in order to keep this post to a manageable length.
We’ll start the code tour in the main function:
func main() {
	// Connect to the database
	client, err := connectMongoDB()
	if err != nil {
		log.Fatal(err)
	}
	defer client.Disconnect(context.TODO())

	db := client.Database(os.Getenv("DB_NAME"))
	provider := mongoDBProvider{database: db}

	router := CreateRouter(provider)
	log.Fatal(http.ListenAndServe(":8080", router))
}
Breaking it down:
- A connection to a backing database is opened with deferred cleanup
- An instance of an auth database provider is created
- A router is created to handle incoming requests
- The server is set up to listen on port 8080
I’ll write a future post on the database logic in connectMongoDB as well as mongoDBProvider which is an implementation of the auth module’s data provider interface. For now, let’s take a closer look at CreateRouter:
// CreateRouter constructs a new Mux with route handlers attached
func CreateRouter(db auth.Provider) *http.ServeMux {
	router := http.NewServeMux()

	// setup the auth module route handlers
	router.HandleFunc("POST /auth/register", auth.RegisterUser(db))
	router.HandleFunc("POST /auth/login", auth.LoginUser(db))
	router.HandleFunc("POST /auth/refresh", auth.RefreshUser(db))

	// set up a protected route handler using the Middleware proxy
	router.HandleFunc("GET /protected", auth.Middleware(protected()))

	return router
}
The auth Provider is passed in to the function so it can be used to set up the auth routes.
- We’re using the standard library’s ServeMux router
- 3 POST route handlers are set up using http.HandlerFuncs defined in the auth module
- The GET /protected route is implemented by a handler function which is wrapped by the auth module’s Middleware handler.
Any route which needs to be authorized by a Bearer token can be set up in a similar way. The protected function is only invoked if the authorization middleware successfully validates an access token passed in the Authorization header.
Here’s the protected method:
func protected() http.HandlerFunc {
	return http.HandlerFunc(func(w http.ResponseWriter, r *http.Request) {
		// pull the user information out of the context
		user := auth.GetUser(r.Context())
		log.Print("/protected route reached: ", user)

		// return 200
		w.WriteHeader(http.StatusOK)
	})
}
When authorization is successful, the current user’s ID and email address are added to the request context and can be extracted with the GetUser helper method. If authorization fails, the wrapped function is never invoked and a 401 Unauthorized response is sent from the middleware.
The bulk of the code in the main package lies inside the database implementation. I’ll examine that logic in my next post. Then I’ll follow up with a post or 2 examining the auth module.
To wrap up this post, I’ll describe a bit about testing within the project.
Testing Approach
One of my favorite aspects of Golang development is the way that testing is fully integrated into the development environment. It feels completely organic to the system. The tests sit right alongside the implementation and are executed by the same development tools that you use to build and run the application.
The template project has tests for both the auth module and the main module. I’ve written the auth module tests as unit tests, using a mocked data provider. They are written using the standard library’s testing.T interface. I’ll talk a bit more about some of those techniques in future posts on the auth module.
For the main module, I’ve written integration tests which hit the external API directly and rely upon a database server to back the service. I’ve also utilized an add-on module called testify which adds testing capabilities like suites, with setup and teardown steps. These come in handy when connecting to an external database and seeding configuration into the system for testing.
There are a couple of relatively easy approaches to hosting the database server required for running the integration tests. MongoDB provides a free tier for their Atlas hosting environment that is more than sufficient for development and testing. I’ve used it and been pleased with the ease of getting started with it.
The option I recommend is using docker to self-host the server on your development machine. I’ve included a docker compose config to run the server locally. You’ll need to install Docker Desktop or an equivalent docker runtime to get access to the docker compose command line.
There are some environment variables which must be set up for running the tests:
export DB_USER=go-auth-user
export DB_PASSWORD=go-auth-password
export DB_NAME=go-auth-template
export DB_URL=mongodb://${DB_USER}:${DB_PASSWORD}@localhost/
export JWT_SIGNING_KEY=go-auth-template
export JWT_AUTHORITY=go-auth-template
The DB_URL provided above represents a local docker hosted setup. It will need some tweaking for Atlas. You can paste in the required URL from the Atlas web interface and update your user/password as appropriate.
To run the integration tests with a docker mongo server, use the following commands:
docker compose up -d
go test .
docker compose down
The docker compose setup I’ve provided does not use a persistent volume to store data, so an up/down cycle will result in an empty database and no collisions on subsequent runs. If you use the Atlas approach, you will want to drop the data collection using the web interface between runs or there will be unexpected test failures.
Conclusion
That’s long enough for a first look at the project. In Part 2, we will take a closer look at the MongoDB integration. MongoDB is one of three database integrations I executed during my Go web service exploration. I’ll share some impressions of all three experiences.
Thanks so much for reading. I’d be grateful for feedback and let me know if there’s anything you’d like me to dig into in more depth.


Leave a comment